By The Way...

...that last post was also a tutorial on how to set up ICC color management in After Effects 7.0. Even if you don't have any interest in working in linear-light, you will still need to select a Project Working Space if you want to utilize AE's ICC display correction, and then you'll need to use the Color Profile Converter effect to bring footage into that color space (if it isn't there already).

For example, if you're working in NTSC video, you could set your Project Working Space to SMPTE-C. Any video footage you import will be assumed to be in this space, and will require no Color Profile Converter effect. But if you wanted to include some artwork from a client that was tagged with Adobe RGB profile, you would apply the Color Profile Converter effect and set Input to Adobe RGB and leave Output at Project Working Space.

Or you could do the opposite. You could select the profile with the wider gamut, Adobe RGB, as your Project Working Space. There are a few reasons why this might be a better plan. You'd then leave the artwork alone and use the Color Profile Converter effect to convert your video footage from SMPTE-C to Project Working Space.

Either way you'd have proper display compensation (i.e. things will "look right") on your calibrated monitor, and you can tell your client that you are faithfully preserving their logo colors on the .01% of TVs that are properly calibrated.

Not easy, kinda scary, but quite useful.

Linear Color Workflow in AE7, Part 1

When AE7 was announced, I posted a list of ten cool things you can do with it. Let's dive right in to one of the biggest, which is that you can scrap eLin and work in a true linear floating point color space.

Warning: The following may have the effect of making AE7's 32-bit float mode sound more complicated than it inherently is, so let me stress that none of what I describe here is strictly necessary for enjoying AE7's new color mode. If you want to experiment with the increased quality and overbright performance of float, just pop your project into float mode and start experimenting. But if you've warmed up to a linear color workflow, perhaps via eLin or similar techniques, then read on for the AE7 equivalents.

The first thing you'll note about AE7's Project Settings dialog is that it has grown substantially. There's now a pop-up for your Project Working Space. This is a the first baby steps of ICC color management in AE. It's not a complete implementation in 7.0, but it is usable, and it's perhaps the easiest way of working in a linear color space.

What you're going to do is select

32 bits per channel (float)

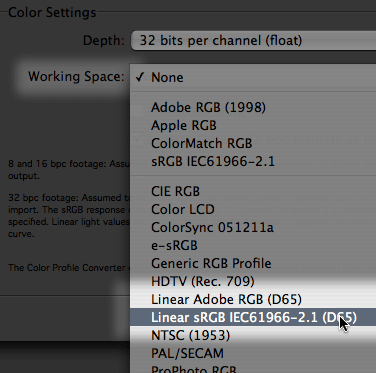
, and then select a linear color profile as your Project Working Space. The problem is that no linear, or gamma 1.0 profiles ship with AE7. So quit AE and download this file:

linearProfiles.zip (4kb zip file)

Unzip it and add the two files contained within to your collection of ICC profiles. On the Mac, that's:

~/Library/ColorSync/Profiles/

On Windows, it's:

C:\Program Files\Common Files\Adobe\Color\Profiles

Restart After Effects, create a new project, and access the Project Settings Window. Select 32bpc mode, and then select one of these two linear profiles as your Project Working Space.

How do you choose between them? Good question, one that entire books have been written to address for the Photoshop community that's been dealing with the joys and pains of ICC color management since before we had RAM preview. You could do worse than to go read two or three of those books right now. If, afterwards, you still have the will to live, pick one of the two profiles at random and plow ahead.

You now have a floating-point project with a linear Working Space. Import a familiar image, preferably one with an ICC profile embedded. Add it to a comp and view the result.

The image will look too bright. Why? Well, AE doesn't recognize the embedded profile. That's right, here's where AE's fledgeling color management leaves us hanging. AE is assuming that the imported footage is already in the Project Working Space. It's not. It's gamma-encoded, so it looks too bright. We have to manually convert the gamma-encoded colors in our image to the linear Project Working Space.

We do this with Effect > Utility > Color Profile Converter. Apply this effect to your image and observe the Effects Controls. You'll see pop-ups for two profiles, Input and Output. The idea here is that we convert the pixels from the image's native color space to that of the project. So set Input Profile to the correct profile for the image, the one embedded within it. Leave Output set to Project Working Space.

Now the image in the comp viewer should look correct. You've converted your pixels to linear light values and your linear image is not only being gamma corrected for display, it's also being display compensated using ICC color management. In other words, for the first time ever, and whether you like it or not, this image will look the same in After Effects as in Photoshop.

There's much more to discuss, but we had to start somewhere. Please comment, query, cry, or acquiesce.

Mine’s Better Than Yours

Or How to Make a Swarm of Flies in After Effects

An interesting debate sprang up in the comments on my previous posts. The question came up of "What do you do in AE that Fusion/Shake aren't good tools for?" While I feel that "my software is better than yours" discussions are silly, there is much to be gained by users and developers from a healthy discourse about the workflows that particular programs have really nailed. “After Effects suxx0rz compared to Shake” == not productive. “I can do this one thing I do a lot really fast in Combustion, whereas it takes forever in Fusion” == productive.

Last year I was putting together a teaser trailer and found myself missing a shot. The shot we desperately needed was a rack-focus from a barn to flies buzzing in the foreground over some unseen form. I had a still photo of a barn, and was able to camera-map it onto some planes in After Effects and create a convincing camera move. Next came the flies.

Creating the swarm of flies that buzzed around the camera, flitting in and out of focus, took 20 minutes.

Don't believe me? Well, I recreated the feat in AE7 for you to watch, The link below is to an unedited screen capture of a 17-minute session in AE7. I was able to shave three minutes off my time because I'd done it once before.

I considered the creation of this shot to be a triumph of AE's flexibility, 3D capabilities (including depth-of-field), and expressions. It might be a bit beyond what most people would consider appropriate for a compositing app, but of course that’s what I loved about it. I made a cool, spooky shot out of a still photo in just a few hours. There are many things I know I could do in Fusion or Shake that I would have a tough time with in AE, but the comment specifically asked for an example of something easier in AE than in Fusion, and I submit to you:

Feel free to comment and include links to your own examples of stuff you did in your favorite app. Better still, include a link that proves me wrong, showing you doing this in 16 minutes with some other tool!