• Blog
  • About
  • Tutorials
  • Prolost Store
  • Archive
    • Recent
    • Featured
    • All
  • Where to Begin?
  • Maschwikipedia
  • Contact
  • Comment Policy
  • Menu

Prolost

by Stu Maschwitz
  • Blog
  • About
  • Tutorials
  • Prolost Store
  • Archive
    • Recent
    • Featured
    • All
  • Where to Begin?
  • Maschwikipedia
  • Contact
  • Comment Policy

FXPHD April Term, NAB 2011

April 01, 2011

FXPHD have announced their April term, which includes a course called Epic On Location, where Mike Seymour and I learn you up some Epic. FXPHD courses are always amazing. I have a friend who mastered an entire RED One feature on a single Mac Pro using the guidance of past RED courses. In this case, Mike literally got on a plane from LA, where he had just picked up his Epic, and flew straight back to the other side of the planet to start using the camera to shoot for the class. I landed in New Zealand a few days later and within an hour of stepping off the plane, I was hanging upside-down from cables with a camera. We had a blast shooting some amazing footage, from cars, ziplines, and helicpoters, on rigs designed for much larger cameras and rigs designed for lightweight DSLRs.

I can’t recommend FXPHD enough, but in this case, this course truly is the only game in town when it comes to learning about this revolutionary new camera.

I will be at NAB for one day only (I’m slowly learning how not to go), Tuesday, April 12th, joining Mike on stage at the Post Pit (Booth SL12205) to talk more about the camera. Come by and say hi and then push right past me when you realize that the Epic is also there. I’ll understand.

I will also mention a few cool new things from Red Giant Software. Stuff you’ll like.

HD Magazine has an article about our New Zealand shoot, featuring some photos of and by me. More photos can be found at my Flickr site.

Tags: Cameras, Color, Magic Bullet, RED
7 Comments

Rebel's Guide on your iPad or Kindle, DV Rebel Tools For Free

March 30, 2011

My book, The DV Rebel’s Guide, is finally available as an eBook for Apple iOS devices, Amazon kindle, and anything that reads the epub format (such as the Nook). This has been a long time coming, and I wanted to celebrate by giving away updated versions of the DV Rebel Tools scripts that I included with the original edition of the book.

These scripts create a tool palette that turns Adobe After Effects into a full-featured onlining tool. Add color correction effects to clips easily (including Colorista II if you have it installed), and check your grading continuity with a powerful thumbnail view that updates live as you work. For a full tutorial, watch the video:

To install the scripts, download this .zip file and expand it. You’ll see two folders: “Put contents in Presets” and “Put contents in ScriptUI Panels”.

Make sure After Effects is not running. Copy the contents of “Put contents in Presets” into this directory:

/Applications/Adobe After Effects CS5/Presets/

Copy the contents of “Put contents in ScriptUI Panels” into this directory:

/Applications/Adobe After Effects CS5/Scripts/ScriptUI Panels/

Now you can launch After Effects CS5 and find “rd_DVRebelTools.jsx” at the bottom of the Window menu. You can dock the palette into your workspace wherever you like.

Although I created the nerdy expressions and presets that power the DV Rebel Tools, there is a limit to my nerd powers, and that’s where Jeff Almasol stepped in and created the amazing scripts that automate the tools. A big and continued thanks to him. Check out his other handy scripts at redefinery.com.

Update 2011-03-30

After some Twitter responses I figured this is a good place for a quick FAQ:

Q: A lot has changed since the release of The DV Rebel’s Guide. Ever thought of doing a update?

A: No. I’m gonna make movies instead. Besides, the best parts of the book still apply even with a new generation of camera tech.

But don’t despair, because I can’t seem to shut up either. If I were to do an update, it probably wouldn’t be a dead tree product. It would be somehow electronic, and mobile, and able to hold file and video links, and be a part of a conversation, and constantly updated.

Waitaminute… in the famous words of Madge, you’re soaking in it.

So let me change my answer. Yes.

Tags: Color, DV Rebel's Guide, Filmmaking, Magic Bullet
28 Comments

Your New TV Ruins Movies

March 28, 2011

If you bought a television recently, or are considering buying one, take heed: your beautiful new flat-panel TV will try very, very hard to make whatever movies you watch on it look not just bad, but aggressively, satanically, puppy-drowningly bad.

It Starts With the Color

TVs are designed to do one thing above all: sell. To do so, they must fight for attention on brightly-lit showroom floors. Manufacturers accomplish this in much the same way that Times Square does — by cranking everything up to eleven. You want brightness? We’ll scald your retinas. You want sharpness? We’ll draw a black outline around everything for you. Like bright colors? We’ll find them even in Casablanca. Oh, and since you associate “yellowing” with age and decay, we’ll also make the image as blue as a retiree’s bouffant on Miami beach.

Here’s how Inception is supposed to look:

Here’s how Inception looks at your local big-box TV store:

It’s understandable how this comes to be. After looking at the TV store version, the correct version looks positively sad. This is why we don’t taste Pino Noir after drinking a Doctor Pepper, and why you can’t compare TVs in a store. At Best Buy or Costco, you’re not comparing TVs, you’re comparing settings. It’s not just that TVs in stores are too bright, too colorful, and too blue—they are clawing over one another to display the brightest, bluest, and most saturated image on a wall of 300 competitors.

At home, you don’t have 300 other TVs to compare yours against, so you won’t suffer from your natural inclination to gravitate toward the most candy-coated images. At home, you’ll be delighted with Inception looking exactly as intended. But, chances are, you won’t be seeing that, because the default settings are wrong.

Fortunately, you probably won’t be seeing the hyper-colorful showroom version either. Most reputable manufacturers want Energy Star approval on their flatscreens, and part of that certification means that the sets cannot come off the truck in “demo mode,” also known as “torch mode.” You may be presented with a choice when you first power up the set: demo mode or something like “home” mode. Pick “home” mode and your default settings will be somewhat tamer than the “hey, look at me” showroom floor configuration.

And that, right there, is as far as 95% of TV owners will ever go toward “calibrating” their TVs. More than ever, this is a tragedy.

How to Fix Your TV’s Color

Most TVs have some preset modes deigned for different uses. There’s often a “Cinema” or “Movie” picture mode. Use it. It’s the best, easiest shortcut to setting up your new TV to be as inoffensive as possible. These modes will be quite subdued compared to the amped-up default settings, so chances are, when you first switch them on, you’ll experience a bit of that “wow, that sure is yellow” sensation that you get when you look back to the correct Inception frame after staring at the torch-mode one for a minute. Don’t worry, this will pass almost immediately.

Even with this done however, your TV is, in all likelihood, still actively trying to destroy cinema, right in your home. Chances are your new TV is an LCD panel, and chances are it features “120Hz!” or even “240Hz!!!”

Motion Smoothing, Emotion Ruining

First, let’s talk about LCD technology versus plasma. Most TVs these days are LCD. Some manufacturers have completely phased out plasma. Why? Because while plasmas look better than LCDs in your home, they don’t win the brighter-bluer battle on the showroom floor.

Pause for a moment to reflect on this tragedy—this battle of who can make the most egregiously wrong image has actually caused a superior technology to fall out of favor with manufacturers. Plasmas lost by making movies look they way they’re supposed to.

How exactly is plasma superior? For the time being anyway, plasma TVs can render much darker black levels than even the best LCDs. This is the single most important factor affecting image quality in the home, where you are likely to watch movies with at least some of the lights off. It’s also something you just plain cannot judge in a brightly-lit store.

It’s worth stating again: If you are TV shopping, just about the worst thing you can do is go look at TVs in a store.

Plasma sets also tend to have superior viewing angles. This means that they look good from a broader array of seating positions. LCDs tend to have a “sweet spot”—they can look fine for whomever is seated right in front of them, but the image quality degrades rapidly as you move off-axis—and that’s both side-to-side and up-and-down.

But my personal favorite thing about plasma TVs is that they usually don’t have a feature common in LCD sets: motion smoothing.

This “feature,” which goes by different names, is associated with sets that tout “120Hz” or “240Hz.” Those are refresh rates, and LCD sets need to tout fast refresh rates, because in the early days of LCDs, they suffered from poor, smeary motion rendering. Those days are gone, and a modern LCD is perfectly capable of displaying 60 clean images per second, which is perfect for NTSC video.

Now I’m going to do that internet-unfriendly thing I try to do every so often, which is make a nuanced point. A 120Hz or 240Hz refresh rate is not inherently a bad thing. In fact, they can be good. Both are multiples of 24, where 60 is not. A 60Hz TV, such as a CRT, must display 24p material using an alternating cadence known as 3:2 pulldown. Every other frame is shown for slightly longer or shorter than the previous (2/60ths of a second, then 3/60ths, then 2, then 3, and so on). We don’t tend to notice this, but it is hardly the same as seeing each frame for precicely 1/24th of a second.

120Hz and 240Hz TVs have the potential to show you each 24p frame for exactly 1/24th of a second, perfectly replicating The Way Movies Look, and that’s great. The problem is, it’s hard to make them do that, because of awful motion-smoothing settings that are On by default.

Manufacturers somehow decided that The Way Movies Look is bad, and that they should “fix” this using technology. The same technology that is used in software like Twixtor and Kronos to change frame rates of video. Why show a mere 24 frames per second when we can magically build, or interpolate, new in-between frames and show 120 or even 240 frames per second?

The results, while varied, are certainly “smoother” than 24p. And the engineers rejoiced. “We’ve fixed that horrible ‘film look!’”

You’ve seen this. It’s in every store. A big, bright, blue LCD set blasting Avatar. The image is so smooth and “live” looking, you catch yourself trying to figure out if it’s the game or the movie. Or it’s some classic film, playing big and bright and smooth and causing you to wonder if you’re somehow seeing the EPK “behind the scenes” video instead of the actual movie.

24 FPS is Movies

Filmmakers were not content to make movies with video cameras until those cameras could shoot 24p, because video, with its many-frames-per-second, looks like reality, like the evening news, like a live broadcast or a daytime soap opera; whereas 24p film, by showing us less, looks somehow larger than life, like a dream, like a story being told rather than an event being documented. This seemingly technical issue turns out to have an enormous emotional effect on the viewer.

These days, any TV you are likely to buy, will, by default, have technology enabled that completely changes the emotional quality of the movies you watch. This is a cinematic disaster.

But again, let me try to restate my nuanced point: The fact that these TVs refresh at 120Hz or 240Hz is not the problem. It’s the motion smoothing technology, often enabled by default, that destroys the way movies look and renders them as soap operas. And you can turn this off.

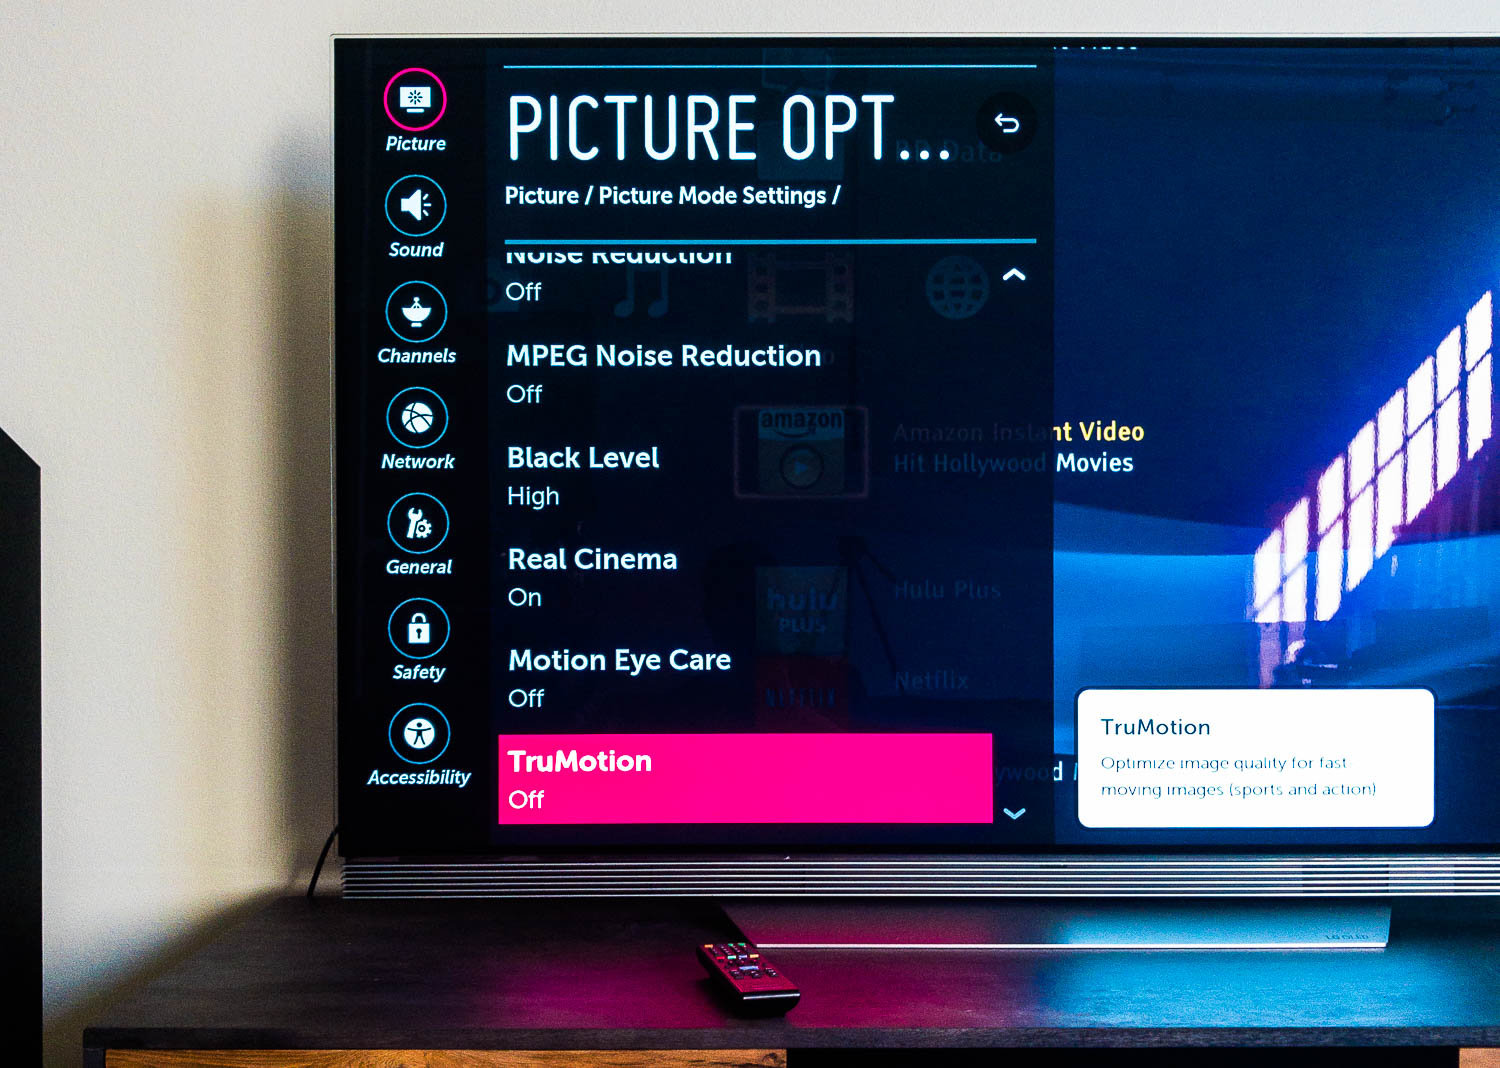
How to Turn Off Motion Smoothing

The process varies among the various manufacturers.

In a Samsung set, the bedeviling setting is branded as “Auto Motion Plus,” and you can set it to Off in the Picture Options menu under Picture.

LG calls it TruMotion, and its found in the Picture menu. Set it to Off.

Sharp calls it simply Motion Enhancement, and you turn it Off at Picture Settings → Advanced. Sharp has a mode called “Film Mode” that is good—it recognizes 24p material and displays it correctly.

Similarly, Toshiba sets have a “24fps Cinema Mode” that displays film material at a true 24 unadulterated frames per second.

Panasonic, despite making the best plasmas available, joins the sad trend with their LCD sets in the form of “Motion Picture Pro 4,” found under Picture → Advanced.

Sony (not pictured) calls theirs Motionflow, and it’s in various places on various sets, but easy to find. Turn it, say it with me now, Off.

This should be the first thing you do when you buy a new LCD TV. But you should not buy an LCD TV. You should buy a plasma. Remember that plasmas had trouble standing out in showrooms—that what was better about them, and what used to command a higher price than the competition, was impossible to appreciate under bright fluorescents? The result is lower prices. Panasonic plasmas (widely regarded as the best after Pioneer ceded the throne) are dirt cheap these days. Here’s a beautiful 55” model for only $1,150.

Whether you buy a plasma, an LCD, or a laser-whizbang-2000™, you can combat the manufacturer’s need to compete for the attention of jaded mall shoppers using a few simple settings. Turn motion smoothing Off and enable the “Cinema” or “Movie” mode, if it exists. But what if you want to take things a step further and actually calibrate your TV to show a correct video image? The great news is that there are some DVD and Blu-ray discs you can buy that walk you through this process, I recommend Digital Video Essentials HD Basics. It’s $18 on Amazon, and worth every penny. Hilariously, Best Buy themselves actually hock an in-home calibration service, indicting their own supernova-bright showrooms in the sales pitch.

If you’ve been paying attention, you might ask, “But Stu, now that I know how to turn off motion smoothing, isn’t a 120Hz or 240Hz LCD panel the better choice for the 24p movie lover, since it can display a true 24 frames per second?” The answer is still no, because modern plasma displays, such as the Panasonics I like, detect 24p material and switch their refresh rates to 48Hz, displaying a true 24p. So plasma is still the cinephile’s choice for a flat panel.

Now that you’ve stopped your new TV from demolishing cinema in your home, I hope you’ll spread the word. Take your calibration disk over to your friend’s house, or your parents,’ or your friend’s parents’ house and switch this crap off.

Movies are beautiful. We need to stop our TVs from ruining them.

See also:

Slumdog Millionaire

Stripped-Down Blu-rays Selling Blu-ray Are Making Me Hate Blu-ray

Update on 2014-06-23 17:08 by Stu

Panasonic has discontinued their plasma line, so my new recommendation is this model from Samsung. You will have to turn off the Auto Motion Plus, as this default has now infected even plasmas.

Update on 2017-08-31 at 08:38 by Stu

With Samsung's plasma line now discontinued (I bought one of the last ones!), my new recommendation is the LG OLED line, which I bought for my studio. On an LG TV, there are seemingly endless "features" to turn off, but the most important one to kill with fire is called "TruMotion". Leave "Real Cinema" on for the best 24p presentation.

170831-APC_5992-.jpg
Tags: Home Theater
35 Comments

Sony NEX FS100

March 23, 2011

I think Sony may have just made the ultimate DV Rebel camcorder. Check out this video from Hangman Studios and F-Stop Academy:

Price for the body is rumored to be in the $4,500 range.

Update

on 2011-03-23 18:12 by Stu

Big, grumpy review here.

Tags: Cameras, Sony FS100
16 Comments
Image from fxguide.com

Image from fxguide.com

Red Epic HDRx in Action

March 17, 2011

RED came out of the gate strong with a message of the importance of spatial resolution. We were told that the RED One was an important camera because it “shot 4K,” and 4K is better. A more-is-more argument that I agree with only in part.

In the stills world, the obsession with resolution became the “megapixel race,” and only in the last couple of years has some sanity been brought to that conversation. Canon’s 14.7 megapixel PowerShot G10 was assailed for being a victim of too much superfluous resolution at the expense of the kind of performance that really matters, and Canon backpedaled, succeeding it with the G11 at 10 megapixels.

Why is more not always more? First, there’s the simple matter that there is such a thing as “enough” resolution, although folks are happy to debate just how much that is. But there’s also an issue of physics. Only so much light hits a sensor. If you dice up the surface into smaller receptors, each one gets less light. Higher-resolution sensors have to work harder to make an image because each pixel gets less light. This is why mega megapixels is a particularly disastrous conceit in tiny cameras, and why the original Canon 5D, with it’s full-frame sensor at a modest 12.8 megapixels, made such sumptuous images.

All things being equal, resolution comes at the expense of light sensitivity. Light sensitivity is crucial for achieving the thing most lacking in digital imaging: latitude.

What we lament most about shooting on digital formats is how quickly and harshly they blow out. Film, glorious film, will keep trying to accumulate more and more negative density the more photons you pound into it. This creates a gradual, soft rolloff into highlights that film people call the shoulder. It’s the top of that famous s-curve. You know, the one that film has, and digital don’t.

You know how sometimes you drag a story out when you know you have a good punchline?

When RED started talking about successors to their first camera, it was all about resolution. Who ever said 4K was good enough? We need 5K and beyond! Of course the Epic would be have more resolution. But would it have more latitude?

As the stills world’s megapixel race became the high-ISO race (now that’s something worth fighting for!), so too did the digital cinema world get a dose of sanity in the form of cameras celebrating increased latitude. Arri’s Alexa championed its highlight handling. And RED started swapping its new MX sensor into RED One bodies, touting its improved low-light performance and commensurate highlight handling.

Life was good.

And then Jim Jannard started hinting at some kind of HDR mode for the Epic. HDR, as in High Dynamic Range, as in more latitude.

The first footage they posted seemed to hint at a segmented exposure technique. It looked like the Epic was using two frames two build each final frame, and Jim later corroborated this. The hero exposure, or A Track, would be exposed as normal (let’s just say 1/48 second for 24p at 180º shutter). The X Track would be exposed immediately afterward beforehand (see update below) at a shorter shutter interval. Just how much shorter would determine how many stops of additional latitude you’d gain. So if you want four additional stops, the X track interval would be four stops shorter than 1/48, or 1/768 (11.25º).

The A Track and the X Track are recorded as individual, complete media files (.R3D), so you burn through media twice as fast, and cut your overcrank ability in half. Reasonable enough.

But could this actually work? You’d be merging two different shutter intervals. Two different moments in time (again, see comments). Would there be motion artifacting? Would your eye accept highlights with weird motion blur, or vise versa? Would the cumulative shutter interval (say, 180º plus 11.25º) add up to the dreaded “long shutter look” that strips digital cinema of all cinematicality?

RED’s examples looked amazing. But when the guys at fxguide and fxphd got their hands on an Epic, they decided to put it to the real test. The messy test. The spinning helicopter blades, bumpy roads, hanging upside down by wires test. In New Zealand. For some reason.

Thankfully, they invited me along to help.

But before I’d even landed in Middle Earth, Mike Seymour had teamed up with Jason Wingrove and Tom Gleeson to shoot a little test of HDRx. They called it, just for laughs, The Impossible Shot.

This is not what HDRx was designed to do. It was designed to make highlights nicer. To take one last “curse” off digital cinema acquisition. This is not that. This is “stunt HDRx.”

And it works. Perfectly.

Sure, dig in, get picky. Notice the sharper shutter on the latter half of the shot. Notice the dip in contrast during the transition. The lit signs flickering.

Then notice that there’s not another camera on the planet today that could make this shot.

I guess Mike should really have called it “The Formerly Impossible Shot.”

Read more at fxguide, and stay tuned to fxphd for details on their new courses, coming April 1.

Update

on 2011-04-19 21:35 by Stu

Graeme Natrress confirmed for me that the X track is not sampled out of the A Track interval, but is in fact a seperate, additional exposure. There is no gap between the X and A exposures, but they don’t overlap.

The just-posted first draft of the Red Epic Operation Guide has a few nice deatils about HDRx as well.

Tags: Cameras, RED
12 Comments
Prev / Next
Featured
Maxon One
Maxon One

Cinema 4D, Forger, Red Giant, Redshift, Universe, and ZBrush, all in one bundle.

Slugline
Slugline

Screenwriting for Mac, iPad, and iPhone

Prolost Store
Prolost Store

Apps, presets, and other goodies for filmmaking and photography.


Featured Post

Featured
Log is the “Pro” in iPhone 15 Pro
Oct 10, 2023
Log is the “Pro” in iPhone 15 Pro
Oct 10, 2023
Oct 10, 2023

Recent Posts

Featured
Cameras, Phones, and Log — What’s the Juice?
Feb 3, 2025
Cameras, Phones, and Log — What’s the Juice?
Feb 3, 2025
Feb 3, 2025
Kino: My New Favorite iPhone Video App
May 29, 2024
Kino: My New Favorite iPhone Video App
May 29, 2024
May 29, 2024
Apple’s “Let Loose” iPad Event was Shot on iPhone — With Panavision Lenses
May 9, 2024
Apple’s “Let Loose” iPad Event was Shot on iPhone — With Panavision Lenses
May 9, 2024
May 9, 2024
iPhone ProRes Log in Peru and Taiwan
Jan 30, 2024
iPhone ProRes Log in Peru and Taiwan
Jan 30, 2024
Jan 30, 2024
What I Want to Do in Apple Vision Pro
Jan 19, 2024
What I Want to Do in Apple Vision Pro
Jan 19, 2024
Jan 19, 2024
What Does and Doesn’t Matter about Apple Shooting their October Event on iPhone 15 Pro Max
Nov 7, 2023
What Does and Doesn’t Matter about Apple Shooting their October Event on iPhone 15 Pro Max
Nov 7, 2023
Nov 7, 2023