
Readers of The DV Rebel’s Guide know that I like to set up my cameras to record as much dynamic range as possible, resulting in a low-contrast, low-saturation “digital negative” that allows more flexibility for grading in post. If you’ve seen any video I’ve shot with the Canon 5D Mark II lately, whether in the Red Giant TV tutorial or on fxphd, you may have wondered how I set up the camera to achieve this. The answer comes in the form of some in-camera Picture Style settings.
I posted a while back about using Canon’s PictureStyleEditor software to create these custom Picture Styles. Since then I have found that the controls in the camera are more than sufficient for creating a more post-friendly look for the 5D’s video files.
Starting with the “Neutral” setting, I make the following modifications:
Sharpness all the way down
Contrast all the way down
Saturation two notches down
Save that as on of your User Defined Picture Styles. Then, optionally, hop over to the Custom Function menu, select C.Fn II: Image, and enable Highlight Tone Priority.
UPDATE: Or don’t. See Update 1 below.
Your settings should look like this:
This will remove the contrasty, video-like tone curve from your future recordings, and eek out a little more highlight detail. Here’s a shot made with the default settings:

Video frame made with Standard Picture Mode, Highlight Tone Priority off
Here’s that same shot with the Stu settings:

Prolost Settings
You can see the reduced contrast, the increase in shadow and highlight detail. It’s closer to a raw image with a linear tone curve. Zoom in and you can see the difference in highlight handling on the reflections:
Default settings — harsh, clipped highlights

Prolost settings — smooth rolloff in the highlights, increased detail
You can also see the difference in sharpening artifacts. My settings reduce, but do not eliminate, the moiré effect endemic to the 5D Mark II’s line-skipping:

Default settings

Prolost settings
You’re going to put all that contrast and most of that sharpening back in post of course, but in your own way, and with more control, and after any shot-to-shot evening out or clever power windows. The ability to design a “zeroed out” or CINE_LIKE-esque Picture Style is one of the things that makes the 5D Mark II’s video dangerously close to usable.
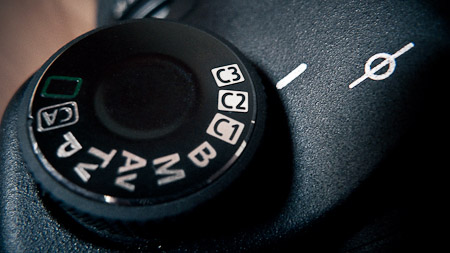
I recommend assigning this setting to one of your Custom notches on the mode dial, so that you don’t inflict these settings on your stills. They don’t affect raw files of course (UPDATE: That’s not actually true, see Update below), but they do get baked into the JPEG previews that accompany those raw files. I have the above settings registered as C3 (along with manual control and a 1/60th shutter), so I can quickly pop into my ideal movie capture settings.
Update
on 2009-11-12 08:04 by Stu
If you do set up your 5D as described above, make sure to do the last step with the custom function so that these settings only affect your video shooting. You probably don’t want to have Highlight Tone Priority on for your stills, especially if you shoot raw. What it does is “push” (reduce) your ISO setting by one stop, causing you to capture a full stop of additional highlight information through no more sophisticated means than simply underexposing. For video and JPEGs, that additional highlight range is non-linearly mapped into the image, creating a very film-like “shoulder.” For raw, it simply passes metadata to your raw decoder that may or may not be honored.
Lightroom, for example, interprets HTP as a simple instruction to boost exposure by one stop. Fair enough, except that this won’t match what you saw on the camera LCD at all. Blacks will be too crushed and that extra highlight detail will be missing (until you futz with the Develop controls to bring it back). Trying to bring more detail back into the blacks will bring in nasty noise that was not visible in the JPEG preview.
Underexposing to capture extra highlight info can be a fine idea, but it’s best implemented case-by-case, and in a predictable way.
Highlight Tone Priority hides the underexposure from you and might cause you to think you’re capturing a more robust negative than you really are.
But for video mode, it creates a more film-like low-contrast, high dynamic range image, with just a touch more noise from the one-stop push.
I now roll with two custom function settings, one with HTP on, one with it off. For daylight exteriors with plenty of light, HTP: On. For lower-light situations, or more controlled lighting, HTP: Off.
Update
on 2009-08-24 21:13 by Stu
There’s an interesting discussion of the nuances of HTP and ISO performance over at cinema5D.com. Interpret tests results such as these with caution though — as the OP says, he’s trying to show off the noise, so it’s not so much a real-world test as it is an attempt to learn more about what’s happening in the camera. Turns out there are some surprizing variations in noise preformance at different ISO settings, possibly having to do with some ISO settings being “virtual,” i.e. metadata offsets of native settings.