Today only, everything at Red Giant is 40% off! Get all the details here.
A Color Session with Stu, and a Huge Sale Tomorrow
This is something different than my usual tutorials. Instead of demonstrating the features of the new Magic Bullet Suite 13, I simply sat down and graded a short sequence of shots. The result is a fast-moving unrehearsed color session in which you see me explore and experiment, using the new Colorista IV panel in Adobe Premiere Pro.
For more Magic Bullet Suite tutorials, check out my announcement post and a whole post just about tutorials.
And if you're inspired to buy Magic Bullet or anything else from Red Giant (like Trapcode or PluralEyes), there's no better day than tomorrow. For one day only, everything at Red Giant will be 40% off in our Year End Sale.
Magic Bullet Suite 13 Tutorials
There's so much new in Magic Bullet Suite 13 that I made like a zillion tutorials.
The essential walkthroughs are all in my announcement post. These tutorials get a little more specific.
Guided Color Correction in Magic Bullet Colorista IV
There's no better example of Red Giant's commitment to make great color accessible to all video editors than the new Guided Color Correction feature in Colorista IV. The tool walks you through a step-by-step process of balancing out a shot. You get great results easily, and you stay in control the whole time.
My Color Grading Pipeline
Reduce noise and compression artifacts first. Then basic color balancing, followed by creative color grading. Then, as a final step, re-introduce grain or texture as desired. That's my pipeline on almost every shot I color correct, and this walks you through the process, using Magic Bullet Denoiser III, Colorista IV, and the all-new Renoiser film grain emulation tool.
Saving Look Presets in Magic Bullet Looks
With Magic Bullet Looks 4, we updated the way you save your own Looks. It's now so easy that you should very much not need this tutorial.
And Tool Presets Too
I heard you like presets with your presets. Each individual Tool in Magic Bullet Looks now has presets, and this video shows how you access them and save your own.
Working With Log Footage
Log is more than big and heavy and wood, it's also the best way to shoot video for the maximum dynamic range, short of raw. All the tools in Magic Bullet Suite 13 support log, and this video shows you how.
Highlights and Highlight Recovery in Colorista IV
When should you use the Highlights control in Colorista IV, and when should you use Highlight Recovery? The answer is now.
Using LUTs in Magic Bullet Suite 13
Sometimes you feel like a LUT, and Magic Bullet Suite 13 is cool with that. This video covers the new LUT support in Colorista IV as well as the LUT tool in Magic Bullet Looks 4.
The Faded Film Look
Twist on some fresh mustache wax and learn how to achieve the faded cinematic look that you alternately complain about and then kind of like and want, using the new Point Curve in Colorista IV and Looks, and the Fade It control in Magic Bullet Mojo II.
More to Come
But that's it for now! You can find more Stu-torials here.
Magic Bullet Suite 13
Red Giant has just released Magic Bullet Suite 13, a massive update to our color correction and look creation tools.
This is such an epic update that I barely know where to start.
Colorista IV
Colorista IV is my new favorite creative tool. It now runs as a panel inside Adobe Premiere Pro and After Effects, which means that you can use it as your go-to color tool without ever having to manually apply it to your clips. Just start working with the panel and Colorista is there.
Colorista IV features new Temperature and Tint controls, as well as LUT support, log processing, an updated keyer, and a new Point Curve that works seamlessly with the familiar Colorista parameterized curve.
There’s also Guided Color Correction, a graphical step-by-step process that helps anyone quickly and easily balance out one shot, or 100. These steps are based on the techniques that a real Hollywood colorist uses to teach editors the basics of color grading, and it’s a meaningful example of how Magic Bullet empowers everyone, regardless of skill level, to create great color.
Denoiser III
Oh man. This is a big one.
Magic Bullet Denoiser has alway been good, but good was not good enough for us. We started over from scratch with an entirely new GPU-accelerated computer vision algorithm that a team of engineers spent years perfecting. It’s not only faster than Denoiser II, it also produces much higher quality results.
And, maybe most importantly, it’s incredibly easy to use. Because the new engine analyzes each frame individually and builds a noise profile, we’ve been able to simplify the controls down to just five sliders — and two of those are for sharpening.
Denoiser III is so fast that it can play back in real time on many systems at the default settings. Or crank up the quality and get great results on even your noisiest footage — Denoiser’s adaptive playback will still give you great performance if it detects that you’re playing back at a proxy resolution.
Denoiser III cleans up compression artifacts as well, and it effectively promotes your footage to the highest bit-depth supported by your editing software. It’s a DSLR/mirrorless shooter’s best friend.
Denoiser III is possibly one of the most important tools Red Giant has ever created. It runs in Premiere, After Effects, Final Cut Pro, and is coming soon for DaVinci Resolve.
Renoiser
Renoiser is a new addition to the Magic Bullet Suite. I’ve always wanted to make the ultimate film grain emulation tool, and we finally did it. The problem with most grain effects is that they simply slap a grain layer on top of the footage with a blend mode. Renoiser takes a different approach, actually rebuilding your image out of virtual grain. The grain actually “stirs up” the pixels and pushes them around — and you control how much using Size and Texture sliders. We’ve got customizable presets for popular film stocks and styles, as well as some utility noise modes that help any project survive downstream broadcast and web compression.
Renoiser also features powerful, adaptive sharpening. I plan on using it on everything I make.
Film
Magic Bullet Film is now optimized for Mercury playback in Premiere. This means that all the color correction tools in Magic Bullet Suite 13 are now real time. Yay!
My buddy Pete Lee recently graded this cool music video using Magic Bullet Film:
Magic Bullet Looks
Magic Bullet Looks is more than just a color corrector, it’s also a powerful simulation engine for real-world camera filters and effects. Presets make it easy to get started, but the friendly interface invites you to customize, tweak, and make the look your own.
In this update, Magic Bullet Looks features over 50 new looks, a new way of working with log footage, and a new Reference Library feature for storing and comparing shots. Renoiser, Colorista IV, and Mojo II tools are built right in. Oh yeah, and we rebuilt it for real time Mercury playback in Premiere Pro.
Cosmo II
Another ground-up rewrite, Cosmo II features an all new smoothing algorithm that makes people look great, often with just one click. You’re going to make a lot of people happy with this one.
Mojo II
Yet another ground-up rewrite, Mojo II is all about making your footage look great, fast. Mojo creates a cinematic look by adding color contrast, unifying your color palette, and offering easy shot-to-shot adjustments. It’s perfect for editors who need to make log footage look great for a rough cut, but it’s also used as a final sweetening pass by real Hollywood colorists.
Color and the Color Experience
I used to think that my role in overseeing Magic Bullet was to make professional color correction accessible to everyone. But in today’s world, where a lot of color software is effectively free, I now realize my role is much more challenging — but also more rewarding. My job is to make great color results accessible through easy-to-use tools that don’t sacrifice any power, and work the way you want to work, right inside your editing software. Color work is real work, but the tools don’t have to be punishing. Red Giant has devoted an immense amount of effort to make Magic Bullet a great creative experience for anyone who wants better color, whether they’re grading an entire feature or just punching up a quick edit.
And we’re not done yet.
Magic Bullet Suite 13 is available now from Red Giant.
Three cameras that can make photos with blurry backgrounds.
iPhone 7 Plus Depth Effect is Legit
The star feature of the iPhone 7 Plus is its dual-camera system. The typical 28mm-equivalent iPhone camera is joined by a 56mm-equivalent. This allows for a 2x optical zoom at the touch of a virtual button, but, more interestingly, it also opens the door to some interesting computational photography.

56mm equivalent is not "telephoto" Apple.
Two cameras don't really make for a light field camera, where a computer model is built of the captured light rays, allowing them to be projected onto a virtual image capture plane, through a synthetic aperture. That's what Lytro is doing with their plenoptic Cinema Camera (see previous post), and more analogously, what Light is promising with the 16-lensed L16 camera (two posts on that one so far).
Computational Photography is Here (and Has Been for a While actually)
I'm pretty sure that with only two cameras, you can't build a useful light field. But can you do computational photography? That's a trick question, as the iPhone, and many other mobile phone cameras, are already doing computational photography. Already the iPhone will automatically perform an HDR merge of two exposures, for example. But even when the iPhone snaps a single, non-HDR exposure, the amount of post-processing it does is considerable.
We've gotten to test this first hand recently with Apple opening up raw capture to developers. Adobe jumped on this right away with Lightroom Mobile, having already implemented raw in their Android version. The first thing you notice when shooting raw DNG files with your iPhone is how noisy the image are. Turns out Apple's been doing a ton of noise reduction on their photos for a few generations now. It's entirely possible that they are using multiple exposures to aid in this process, but I don't know if anyone's ever confirmed that.
Portrait Mode, Depth Effect
Apple calls their initial two-lens computational photo offering Portrait Mode, and the most recent developer beta of iOS 10.1 includes a beta version of it. Under the right circumstances, this mode enables a so-called "Depth Effect," where both cameras fire simultaneously, and a depth map is built based on the subtle stereo disparity between the captured images. This nine-level depth map is used to drive a variable-radius blur. The result is a photo with simulated shallow depth of field.
This process can never be perfect, but can it be good enough?
Oh hell yes it can.
Why Do We Care?
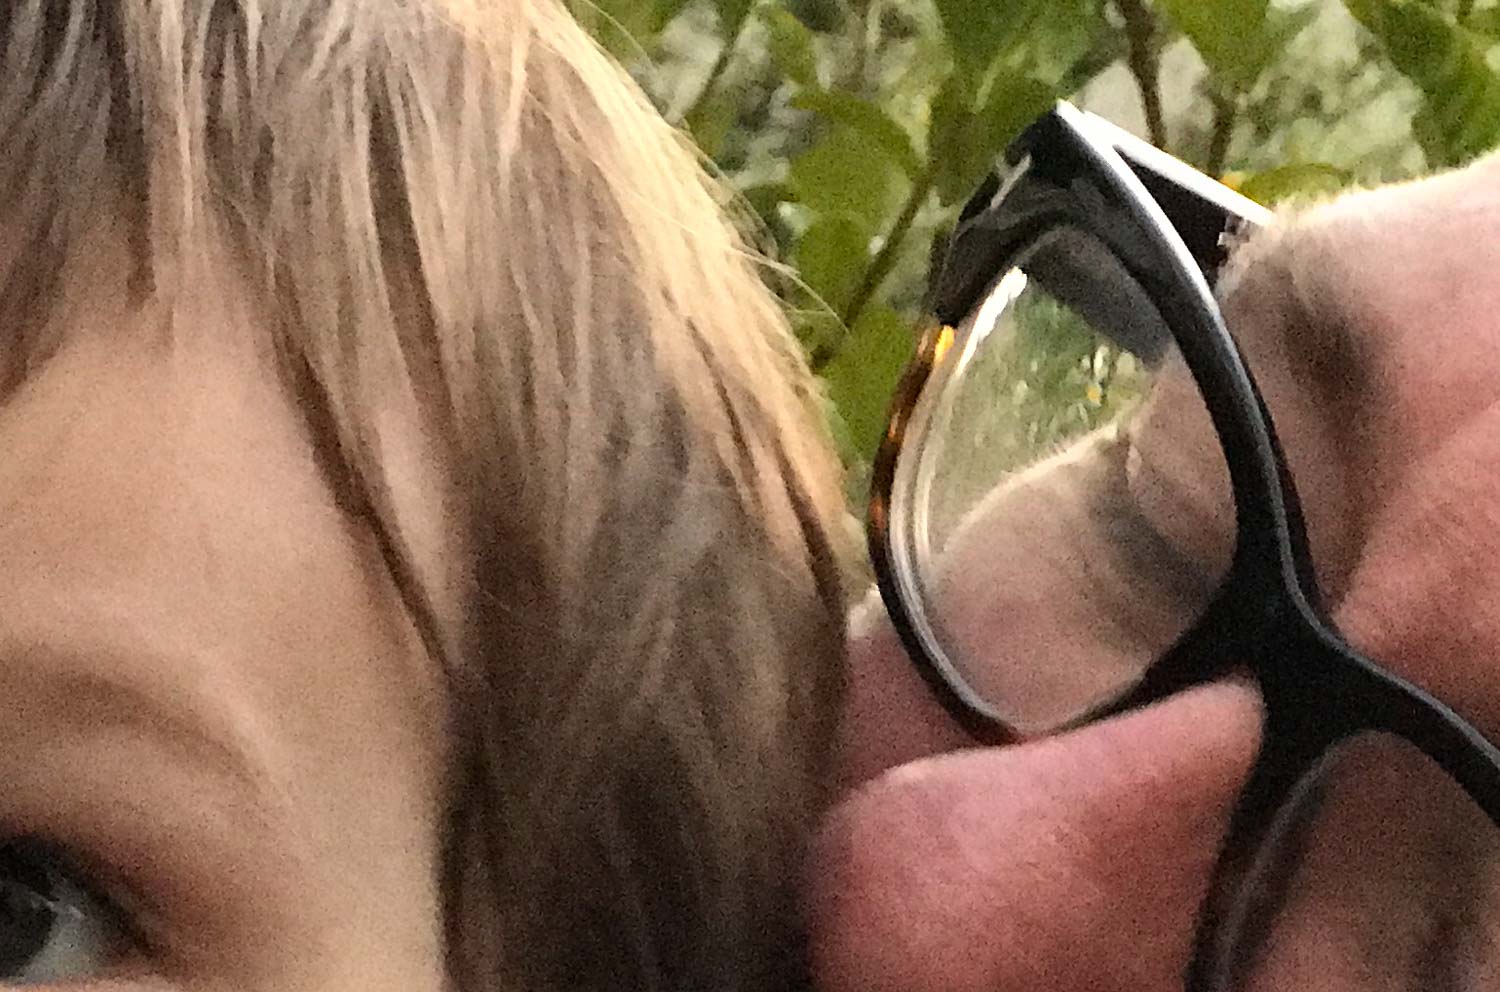
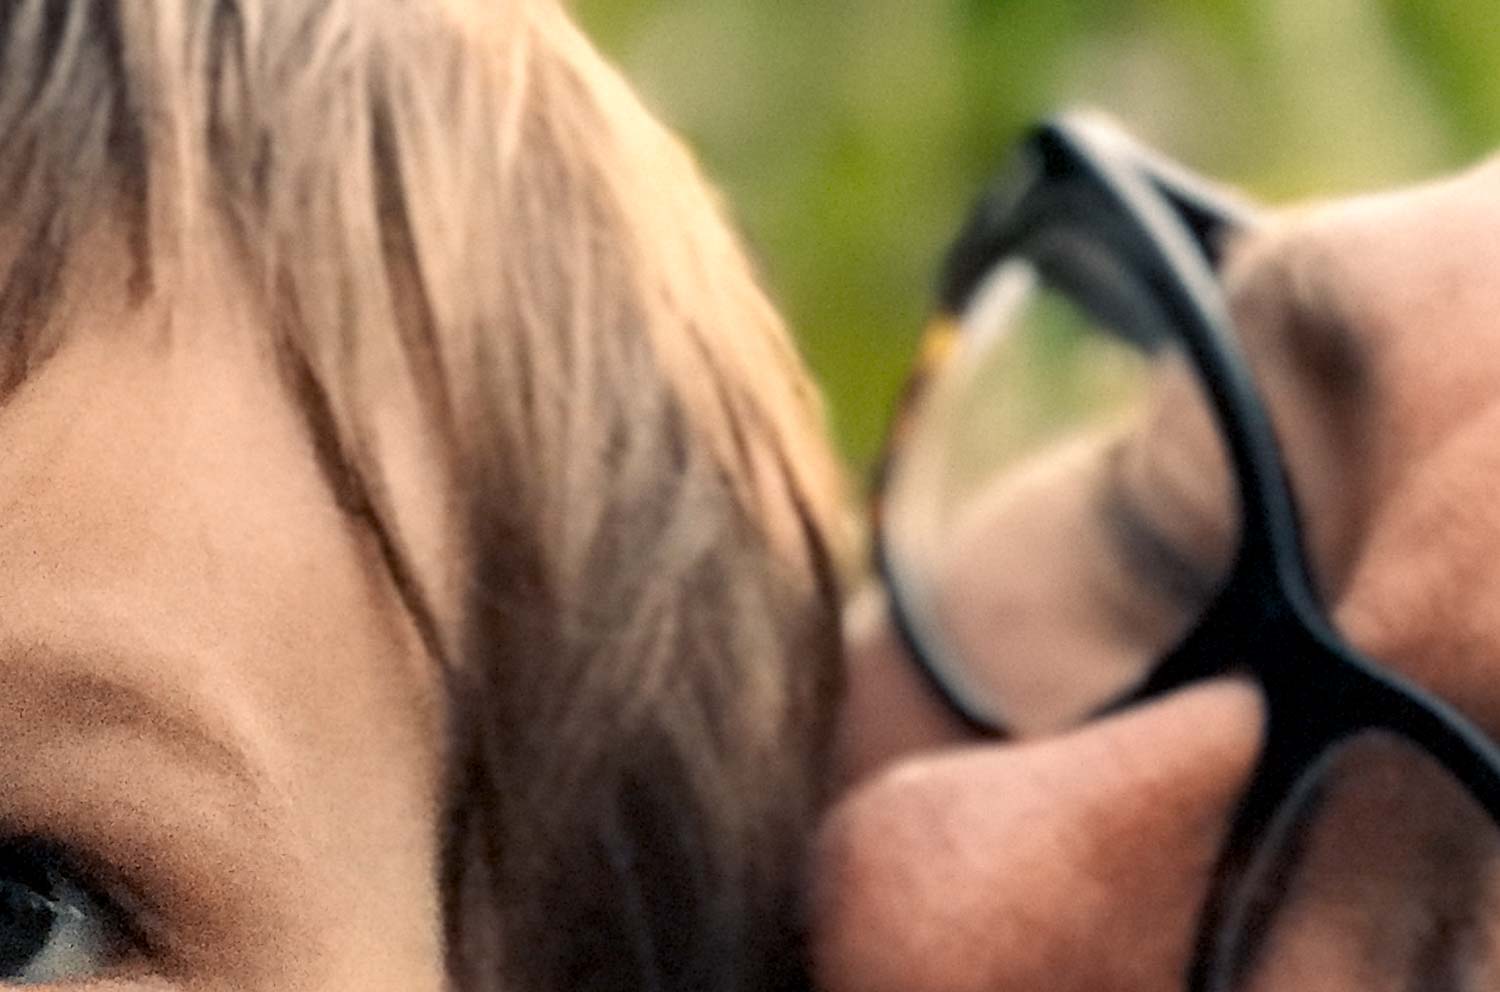
When I first started testing Portrait Mode, I was alone in my backyard, with only inanimate props. I took some shots where the Depth Effect shined, and some where it flopped. I posted some samples on Instagram, using an unforgiving split-screen effect that dramatically highlights the imperfections of the processing.
Most notably, the processing gives the foreground a bit of a haircut, which you can see clearly in this example.
This stands to reason. The depth map is very likely computed at a reduced resolution, and I bet it’s noisy. Any smoothing is going to also eliminate certain edge details, and Apple's engineers have, I'm surmising, estimated that eating into the edges a bit overall is better than seeing a halo of crisp background between the foreground subject and the blurred background.
The next night, my family came over for a cookout. As we ate and drank into the evening, reveling in global warming, I remembered that I had a new toy to play with. I pulled out my phone, toggled over to Portrait Mode, and snapped a few shots of my brother-in-law and his adorable son.
This is the photo that convinced me that Portrait Mode is a real thing. Here it captured a fast-moving, uncooperative subject, at ISO 500 lighting, and produced results that are not just good, but actually a photo I cherish.
Is it perfect? No. The effect ate some of the little guy's flyaway hairs. But "perfection" would be a strange goal for a process designed to simulate an artifact. Without a side-by-side comparison, no one will miss those hairs.
So don't ask if Depth Effect is perfect. A better question is if its failures are distracting. And I have certainly taken some test photos where they are. But the funny thing about test photos is that there's often nothing worth photographing in them, so you just stare at the problems. In my own testing, whenever I've pointed Portrait Mode at something I actually care about, the results have been solid.
So back to the question of whether we should care about a fake blur applied in post to a telephone photo. When I tweeted the above shot, someone replied with a reasonable question: wouldn't I love the photo just as much without the effect? I replied no, and added:
Composition matters, and focus is composition in depth.
Portrait Mode photos aren't just photos with a blur applied. They have the potential to be photos that are more about what they are photos of. It gets back to one of the oldest, most durable posts on this site: Less is More. We frame our shots carefully, and shallow depth of field allows us to frame our shots in depth as well.
Sometimes that makes the photo prettier. Often, it can make the photo.
As an example, here's another photo of something I care about: my son, and his uncharacteristic (for a 7-year-old) love of raw oysters.


In the non-depth-effect version, the background is so distracting that I probably wouldn't have shared this photo, but the shallow-depth-of-field version not only looks better, it succeeds in communicating my feelings at the moment of capture.
See, our eyes actually have very deep focus, but our brains and our hearts fire at ƒ/0.95.
The instrument of our eyeballs "sees" everything, but we don't see with our eyes. We see with our brains. And our brains ignore stuff that doesn't matter (to a hilarious fault). This is maybe the number one failing of amateur photography, and certainly mobile photography—we take a ton of photos that wind up being more about weird ugly background details than the reason we wanted to take a picture.
So I posted this oyster shot on Instagram, and someone pointed out how the white blob on the left is eating into my son's elbow a little. This is true, and it's definitely a technical failing of the depth effect. It also reminded me of something that VFX master Dennis Muren once said in dailies when I was a young artist at ILM. Someone pointed out a very real flaw with a shot. But instead of demanding that it be fixed, Dennis brushed the concern aside and declared the shot final. The flaw was not near the subject of the shot, so it didn't concern him. "If they're looking there," he said, "we've lost them."
I sent this shot to a photographer friend who knows how I took it and what problems to look for. His review of the shot is the one that resonates with me: "Your son is growing up too fast, and I want some oysters."
I have a bunch of shots that show Portrait Mode failing. Small foreground objects getting blurred along with the background, edges being eroded noticeably. But I'm not going to post them here because it's not really very fun, and there's a whole internet happy to bash Apple's beta 1 drop of anything. The edge problems will be worth fixating on if they don't improve.
What Are You Giving Up?
It so happens that I also have a full-frame 35mm ƒ/2.0 shot of my kid eating oysters at that same restaurant, earlier this year:
Some obvious differences:
The wider 35mm angle of view, vs the iPhone's 56mm equivalent. Shallow DOF at wide AOVs is an expensive look.
Bloom! The boke of the background lights blooms and pops as one would expect.
Foreground blur: Apple's Depth Effect mostly blurs things behind the point of focus, only very subtly softening anything in front of it. That's either a magic cheat or a huge failing, depending on your point of view. I think it's brilliant that Apple decided to call this "Portrait Mode" and describe it as blurring the background, rather than a more ambitious, and ultimately inaccurate, description of it as a shallow depth of field mode.
All the little frizzy hairs rendered in tack-sharp 42 megapixel glory.
And then there's raw. No, not the food, the photo. This photo was shot with my Sony RX1R II, in raw. I edited both it and the iPhone shot in Lightroom, using the same presets from my Prolost Graduated Presets set, but this one took the edits way better, because it's raw. Slurp!
Of course, the RX1R II is expensive, at almost $4,000. It's tiny for a full-frame camera, and I do bring it with me almost everywhere I go, but despite being smaller than the iPhone 7 Plus in two out of three dimensions, it's not something you slip into your jeans pocket.
Big cameras that shoot raw from a big sensor and fast glass are still king, no question. It's not useful to think of Portrait Mode as competition for them. I look at it this way: Despite all my badass cameras, I will continue to take photos with my iPhone, as I always have. And now they can sometimes look a lot better.
Okay Wanna Nerd Out for a Bit?
Now that we've celebrated that emotional impact matters more than technical accuracy for like the billionth Prolost time, I thought it might be fun to geek out on the images a little and consider just how mighty the task is of producing emotionally resonant fake depth of field on a telephone.
There's been a lot of conjecture about the specific type of blur Apple is doing. I've heard Apple pundits say authoritatively that it's a "gaussian blur." Spoiler: It's not, at least not in any way I've ever seen.
The "right" way to fake a focus blur is with a blur kernel that looks like the boke shape you're going for. Here's a simple example:


As you can see, the gaussian blur (approximated here with five box blurs, which is how Photoshop does it!) looks like mush, and in no way resembles an out of focus image. The focus blur kernel gives better results, at the expense of much longer processing time. And the results are still not great. We all know what an out-of-focus Christmas tree looks like, and that is not it.
There are two more things we need to do to truly simulate focus blur. If we do them, our simulation becomes very, very accurate. I've heard other Apple pundits claim that a synthetic blur can never convincingly match the real thing. That is simply not true. But you gotta do it right.
To do it right, you need to do three things:
Use a properly-shaped boke kernel.
Process the blur in linear-light color space, not gamma-encoded space.
Have an HDR source.
What's linear light? It's something I've talked about a lot here over the years. This video explains it well (though it simplifies gamma down to a power of 2).
Here's what it looks like when you take these three steps:


Okay! That was a lot of work, and the fans on my iMac spun up a bit, but we got there.
Why is it a lot of work? Let's go back to that list:
Use a properly-shaped boke kernel. This is considerably more computationally expensive than a regular soft blur, because you can't iterate a cheap function or easily parallelize the processing for GPU acceleration. There are some optimizations you can do if you keep the center of the blur flat, but for the most part, you just gotta brute force it.
Linear light: This requires high bit depths to avoid banding, and high bit-depths are expensive in both memory footprint and processing.
HDR requires not just high bit depths, but possibly even floating-point color. It also requires that you have enough overhead in your single-exposure raw to count as HDR, because you're probably not going to do an exposure merge with only two cameras.
I did my blurs in 32bpc floating point, using the cleverly optimized software lens blur in After Effects. It took several seconds to process each image, and my 4 GHz Core i7 iMac's fans spun up audibly.
This problem of realistic depth of field has been the subject of much research. With GPU processing, which one must imagine is how Apple is going about this, it's entirely possible that a kernel-based blur isn't the fastest approach. They could be tracing rays, or, maybe more likely, doing a recursive approximation of a disk-shaped blur.
It's heavy math, and Apple is doing it in real-time while you're framing the shot. Impressive.
So now we know what it takes to compute a realistic lens blur. So how do Apple's results compare? Click to enlarge:


Apple's blur is not a perfect match for any of mine, but that makes sense. However Apple is doing the blur, it's probably not the last thing in the image processing pipeline.
To my eye, Apple's blur is obviously not gaussian, or even gaussian-esque. It's some kind of sharp-edged circular blur kernel, maybe computed at a lower spatial resolution than the final image, which would account for some of the softness—and the miraculous speed with which the iPhone 7 Plus can do the job. Their blur is neither as flat as my gamma-space example, nor as distinct as my linear-space simulation, so I can't quite tell where Apple's doing the blur in their order of operations. But it looks closer to my gamma-space version.
This is an area of possible improvement: If Apple could operate on pure linear-light pixels, the blur could become more realistic and pleasing.
They might even get a hint of HDR-esque highlights, as raw files are effectively (modestly) HDR images.
They'll never be as poppy as a real photo of bright, out-of-focus lights though, because there's just not enough headroom to hold all that exposure in an iPhone's raw capture. So why not artificially boost the highlights like I did in my final example up there? Again, I think Apple is being conservative here. Highlight boosting can go horribly wrong, resulting in glowing teeth or eyeballs. It requires manual dialing-in to look acceptable, and even then, it never looks perfect.
Canon 5D Mark II, Canon 50mm F1.4 at ƒ/1.4. Because why should anything be in focus, really.
Another reason that Apple's blurred highlights won't look as punchy as photographed boke is that Apple is usually applying their blur to a image that is already slightly out-of-focus. This means the boke shape, even from a perfectly crisp kernel, will always be a little mushy, because the source was not a pinpoint. Again, Apple could try to account for this, but it would be nearly impossible to do that in an unattended algorithm.
So in conclusion, here's my assessment of the Portrait mode blur processing:
It's good. Apple is doing it right. It's not a gaussian blur.
There's opportunity for improvement.
It's a miracle that a telephone can do all this processing as fast as the iPhone 7 Plus does.
Canon 5D Mark III, Canon 50mm F1.2L at ƒ/1.8. And manual focus, if I don't say so myself.
I didn't geek out on the depth map generation and segmenting, but I could. There's a lot going on there too. And I imagine, somewhat optimistically, that this is an area where we will see improvements in future builds.
The Power of Low Expectations
I didn't think the results would be this good. Apple, uncharacteristically, undersold them. And this created room for a delightful surprise when Portrait Mode turned out to be something I will most certainly use.
One might fairly take me to task for being soft on Apple when I have been so hard on others. I gave Light.co a pretty hard time about their (still unproven) claims of being able to match the multi-dimensional, layered boke from a Canon 7D shot.
One of the things I love about photography is that I simply never know what's going to get me excited about it all over again. It could be something strange and stupid, like an app that makes you wait an hour before viewing the photos it takes, or one that takes pictures that look like an Macintosh Plus screen. It could be a strange old lens with fungus growing in it, or a broken chunk of glass held up in front of a matte box. I reserve the right to be delighted by things, even things that were specifically designed to delight me.
Well done, Apple.