• Blog
  • About
  • Tutorials
  • Prolost Store
  • Archive
    • Recent
    • Featured
    • All
  • Where to Begin?
  • Maschwikipedia
  • Contact
  • Comment Policy
  • Menu

Prolost

by Stu Maschwitz
  • Blog
  • About
  • Tutorials
  • Prolost Store
  • Archive
    • Recent
    • Featured
    • All
  • Where to Begin?
  • Maschwikipedia
  • Contact
  • Comment Policy
presetsInPS.jpg

Prolost Lightroom Presets, Now in Photoshop Too

April 04, 2018

Adobe updated both the Lightroom line of Lightroom CC and Lightroom Classic yesterday, as well as the Camera Raw importer for Photoshop CC. My previous post was all about Profiles. This one is about some important changes to presets.

Lightroom Classic Now Shares Presets (and Profiles) with Photoshop

Lightroom Develop/Edit presets are now saved in the .xmp format that's compatible with Camera Raw in Photoshop, and Lightroom Classic shares a common location for these presets with Photoshop, meaning that your preset collection will be the same in both apps.

In other words, the Prolost Lightroom Presets finally work in Photoshop! If you’ve always wanted the powerful Prolost Graduated Preset workflow in Photoshop’s Camera Raw tool, your wishes have come true.

And the same is true of the Prolost Profiles I released earlier today: When you install them for Lightroom Classic 7.3, you’re also installing them for Photoshop CC.

Presets Preview Big

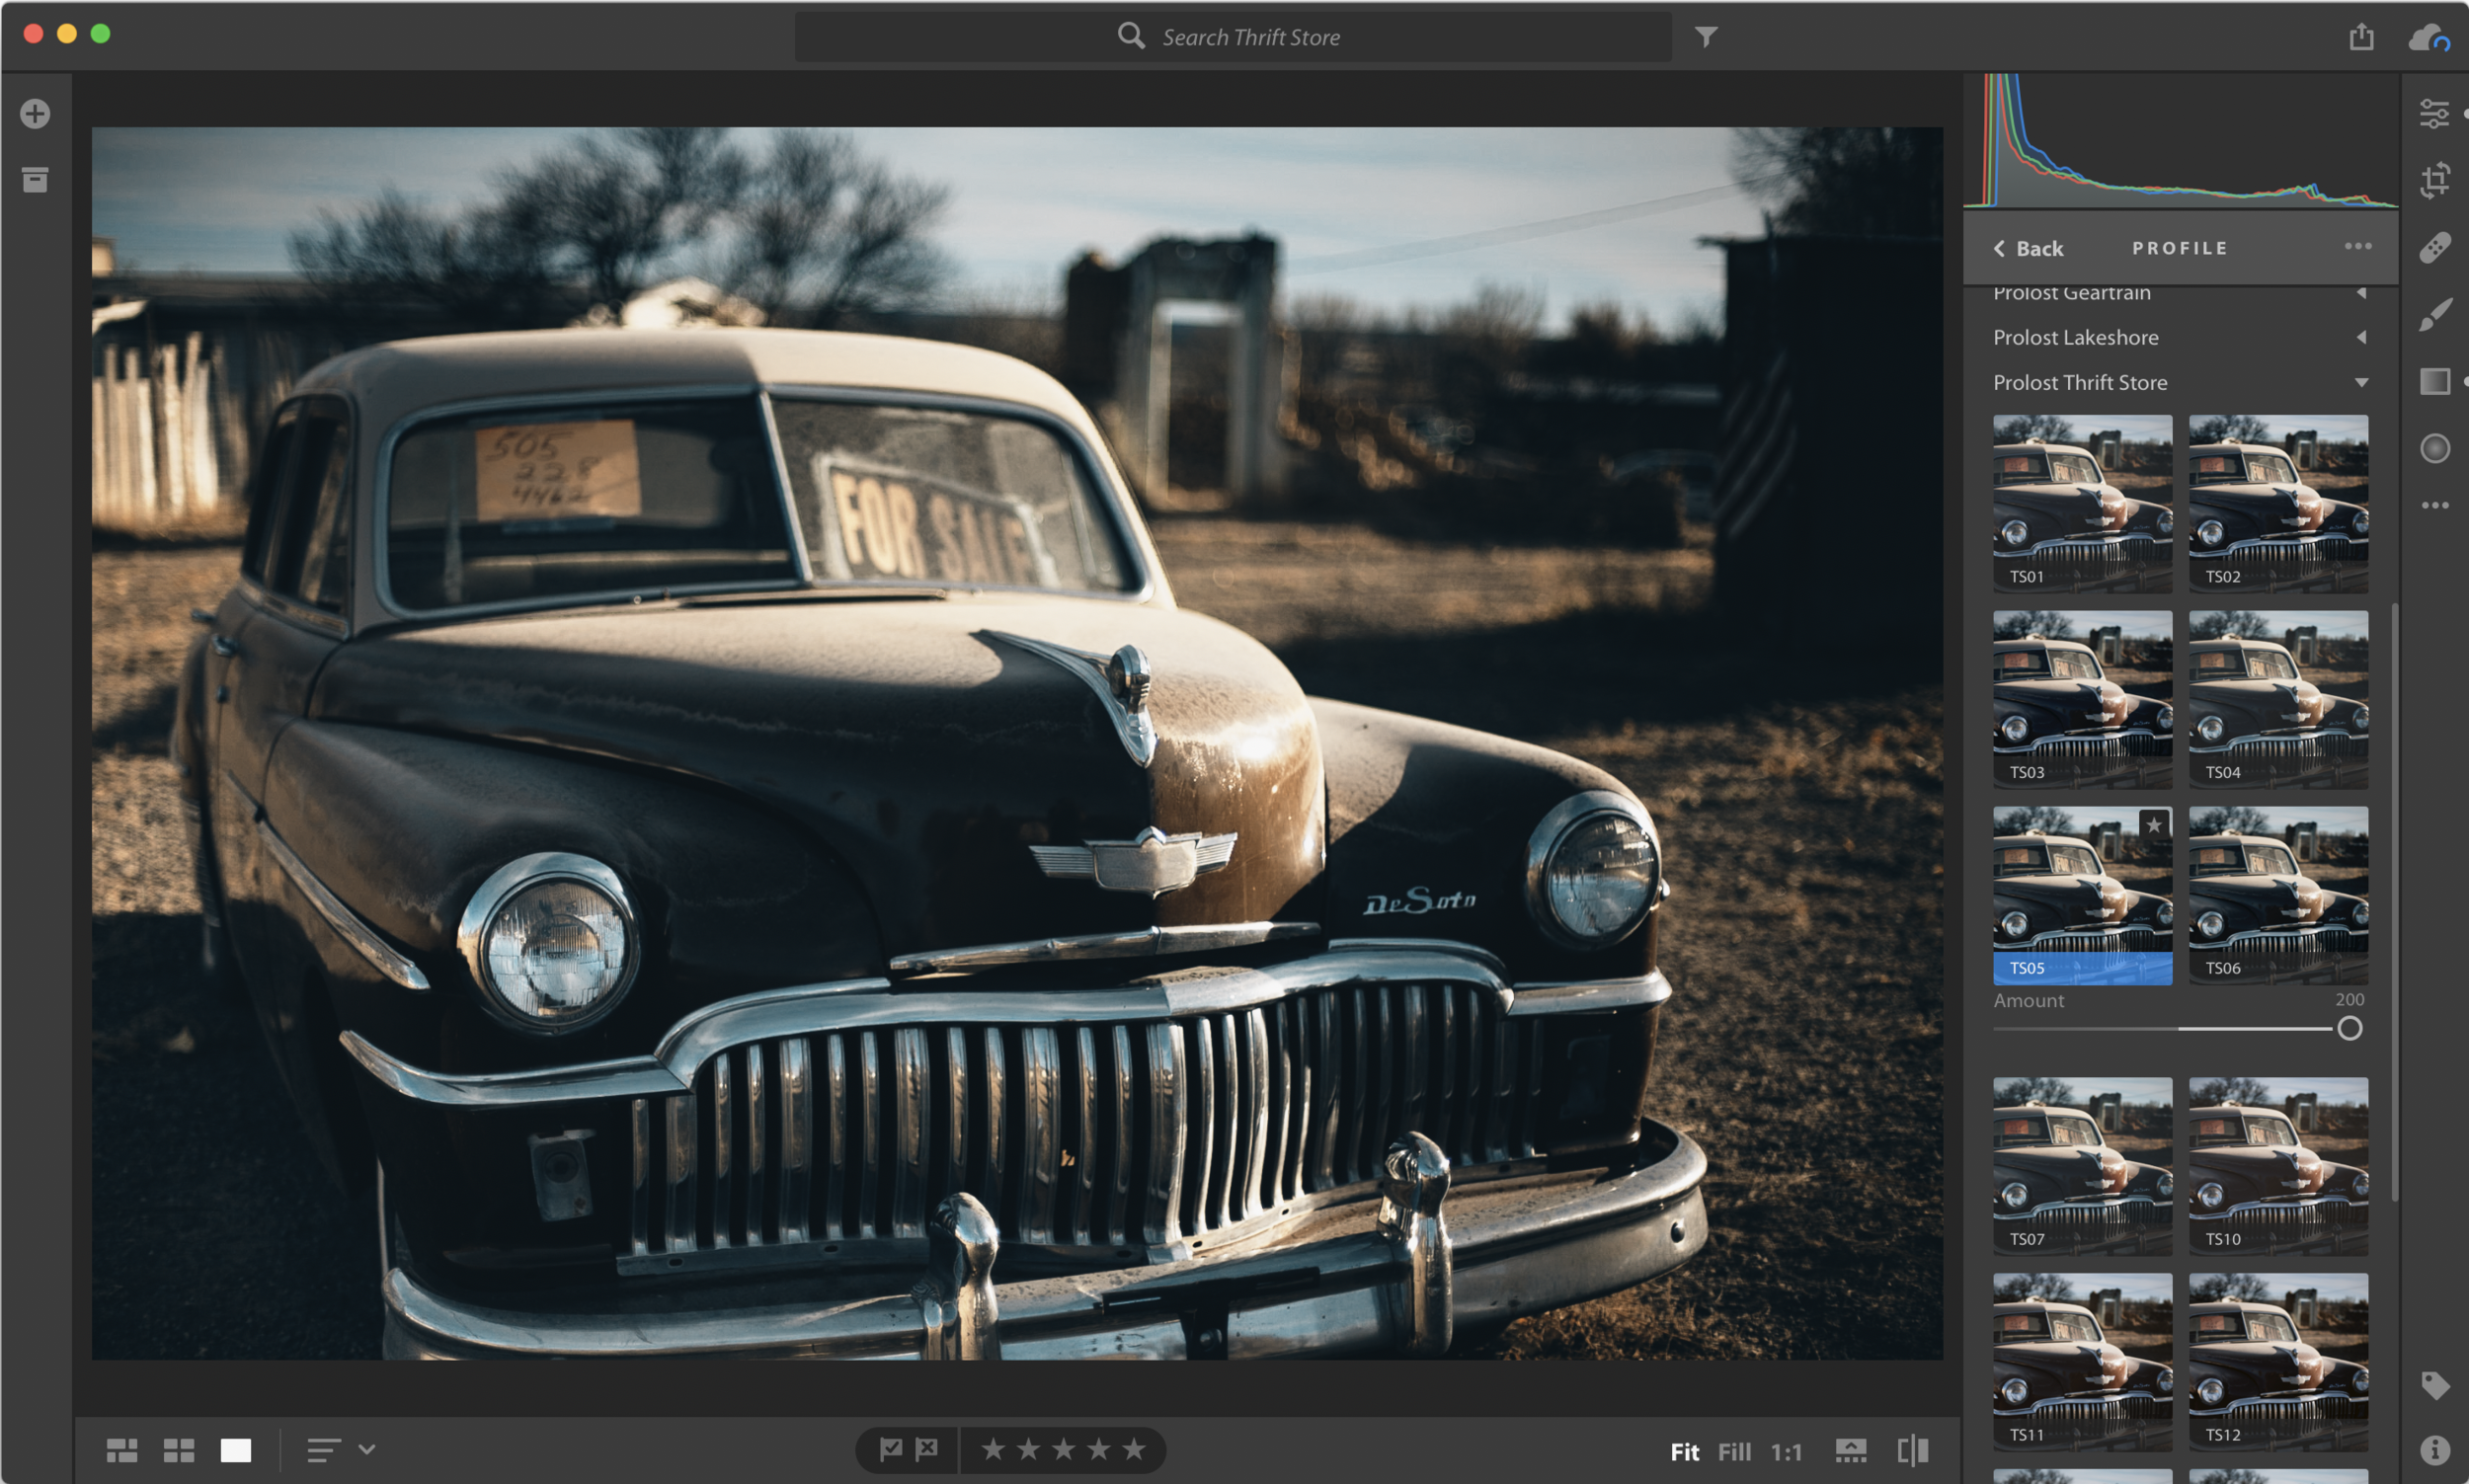
Lightroom CC has always previewed Edit Presets on the full-size “loupe” view of your photo. Lightroom Classic 7.3 now does the same. This welcome change makes the Prolost Graduated Preset workflow even more awesome.

Full-screen previews for presets is a great complement to the Prolost Graduated Presets.

Full-screen previews for presets is a great complement to the Prolost Graduated Presets.

Conversion to XMP is Automatic, and Problematic

When you first run Lightroom Classic version 7.3 after upgrading from a pervious version, your Develop presets get converted to the .xmp format automatically. More details here.

For most presets this works fine, but a few of my Prolost Graduated Presets get corrupted by the process. You can either manually fix just those, or just re-install the entire set. I recommend the latter, as I was able to make some nice cosmetic improvements to the presets thanks to the new format.

There’s also a bug with XMP presets and photos with older B&W profiles. More details here.

Adobe is aware of these issues and working on a fix.

Lightroom CC Does its Own Thing

While Lightroom CC 1.3 also uses the new/not-new .xmp format for presets and profiles, it has its own installation procedure and location for these files. If you use both (against Adobe’s recommendation), you’ll need to install separately for each.

Installing presets for Lightroom CC is now much easier. You can import individual presets, folders of presets, or even zip files containing presets. I've updated my presets and the installation instructions accordingly.

No User Presets for Mobile

Unfortunately there's still no way to install presets (or profiles) into Lightroom CC for iOS or Android.

  • What changed about Presets with Lightroom Classic 7.3 and Lightroom CC 1.3?
  • What's the Difference Between Lightroom Presets and Profiles?
  • What happens to my Prolost Presets when I upgrade to Lightroom Classic 7.3?
  • How are Presets and Profiles shared/synced among Lightroom Classic, Lightroom CC, and Photoshop?
  • Installing Presets and Profiles in Adobe Lightroom & Photoshop
Tags: Color, Lightroom, Photography, Adobe, Photoshop
1 Comment
Prolost Profiles in the new Profile browser in Lightroom CC 1.3, released today.

Prolost Profiles in the new Profile browser in Lightroom CC 1.3, released today.

Introducing Prolost Profiles for Lightroom

April 03, 2018

Adobe released Lightroom Classic 7.3 and Lightroom CC 1.3 today, both featuring improved support for Creative Profiles, which have the potential to give your photos exciting new looks.

Prolost Profiles

To celebrate this launch, I’m releasing six sets of Creative Profiles on the Prolost Store.

Screenshot 2018-04-03 06.50.04.png
Prolost Profiles on the Prolost Store

These are fun, powerful looks for your photos that you can browse visually and audition with a full-screen preview. Yes, Lightroom has finally caught up to where Magic Bullet Looks has been for years.

Like all my Lightroom offerings, I made these profiles for my own photography, and I’m sharing them with you in the hopes that you find them fun and useful. I’m excited to finally be able to create looks in Lightroom that go beyond what we can create with just the Develop sliders.

View fullsize -160304-DSC00330.jpg
View fullsize -160322-DSC07976.jpg
View fullsize Blockbuster-070331-P1030514.jpg
View fullsize -071118-IMG_6411.jpg
View fullsize -180301-STU_3467.jpg
View fullsize -160304-DSC00828.jpg
View fullsize -071123-IMG_7870.jpg
View fullsize -160304-DSC00410.jpg
View fullsize -081015-IMG_4843.jpg
View fullsize Cephalopod-071118-IMG_6715.jpg
View fullsize -180315-APC_1563.jpg
View fullsize -130323-STU_8742.jpg
View fullsize -160322-DSC07838.jpg
View fullsize -050427-DSC_3338.jpg
View fullsize -170620-DSC08805.jpg

Presets and Profiles

Where Lightroom Develop Presets are shortcuts to applying Develop/Edit settings, Lightroom Profiles typically apply an overall look to the photo. They leave all the Develop/Edit controls unchanged, so you can adjust them to taste. Unlike Presets, Profiles can create looks that are not possible with the Lightroom controls on their own (through the use of 3D LUTs).

Lightroom has long supported “Camera Profiles,” but they were not very visible, and used mostly to match camera JPEG output. With today’s updates, Profiles get a nice visual browsing system that’s front-and-center in the interface, and a differentiation between Camera Profiles and “Creative Profiles” like mine.

The cynical take on Creative Profiles is that they’re like Instagram filters for Lightroom. But given that they work on raw files, and that they combine with the immense and tasteful editing controls available within Lightroom, I think it’s much better to think of them as “virtual film stocks.”

Creative Profiles can support an Amount slider, so you can apply as much or as little of the look as you like. So like everything in Lightroom, they are just tools that rely on your eye and taste to provide good results.

All the Prolost Profiles support the Amount slider, so you can season to taste.

All the Prolost Profiles support the Amount slider, so you can season to taste.

What About Mobile?

While new versions of Lightroom CC for iOS and Android were also posted today featuring the same built-in Creative Profiles as CC Desktop and Classic, there’s not yet any way to install custom profiles like mine on the mobile version of Lightroom.

Changes for Presets

These Lightroom updates change how presets work too. It’s a big enough topic that I’ll cover it in my next post, but if you want answers now, you can check out the FAQs over on the Prolost Store:

  • What changed about Presets with Lightroom Classic 7.3 and Lightroom CC 1.3?
  • What's the Difference Between Lightroom Presets and Profiles?
  • What happens to my Prolost Presets when I upgrade to Lightroom Classic 7.3?
  • How are Presets and Profiles shared/synced among Lightroom Classic, Lightroom CC, and Photoshop?
  • Installing Presets and Profiles in Adobe Lightroom & Photoshop

Read more about this Lightroom update at the Adobe Blog.

Tags: Lightroom, Color, Photography, Adobe
8 Comments
Screenshot 2018-02-19 16.09.15.png

Prolost EDC 2.0 for After Effects

February 20, 2018

38 Free Utility Presets for After Effects

Last week’s post on blur effects in After Effects was also a stealth release of Prolost EDC 2.0. I launched Prolost EDC in 2015, and I’ve updated it a few times since then, but this is the biggest refresh yet.

Get Prolost EDC

Tiny Timesavers

I work hard to make my laziness possible.

— Stu Maschwitz (@5tu) February 5, 2013

Prolost EDC is a collection of After Effects presets that are mostly very simple shortcuts to things I do all the time. For example, usually when I apply the Shift Channels effect, it’s to do something simple, like move the alpha channel into RGB, or copy the red channel to all three RGB channels. But these simple things actually require quite a few clicks in fussy little menus. With Prolost EDC installed, typing “Shift Channels” into the search field in the Effects and Presets panel brings up this list:

 
Screenshot 2018-02-19 12.26.39.png
 

Now the simple thing I wanted to do is just a single click away.

More examples:

  • Typing “grid” brings up the Grid effect and also my Grid by Width preset, that has the settings configured the way I usually want to use the Grid effect, with a single slider controlling the size of the squares.
  • Type “ramp” and you’ll get the Gradient Ramp effect, as well as the EDC variants Linear Ramp Horizontal, Radial Ramp Corner, and Radial Ramp Side Edge, all of which use expressions to automatically size the gradient to useful configurations.

These are the simplest kind of Animation Presets you can make in After Effects — just single effects with custom settings. Whether or not you find mine useful, I highly recommend you make some of your own.

Color Space Conversions

Maybe my most-used effects.

  • sRGB to Lin
  • Lin to sRGB
  • Cineon Log to Lin
  • Cineon Lin to Log
  • Sony S-Log2 Log to Lin
  • Sony S-Log2 Lin to Log
  • Alexa V3 LogC Log to Lin
  • Alexa V3 LogC Lin to Log
  • Lin to Kodak 2383 Emulation

Thrilling, right? But oh-so-handy.

Expressions With a Bow on Top

I have a library of commonly-used expressions. Where possible, I’ve packaged them up as presets to make them easier to apply, and included them in Prolost EDC. These presets range from simple to complex, and many have custom UIs.

  • Prolost Wiggle Position provides a GUI for the greatest expression of them all, wiggle(). An easy way to control the randomized motion this function creates.
  • Prolost Pixel Perfect provides checkboxes to force a layer’s Position and/or Anchor Point to snap to integer values. Handy when animating UI mockups or small title text.
  • Prolost Pixels Per Frame lets you easily animate a 2D layer to move a certain number of pixels per frame in X and Y. This can dramatically increase the visual smoothness of scrolling credits.
  • Prolost Spanner 2D is a GUI wrapper for a set of expressions that make one layer point at another. Use it for everything from motion graphics animations to animated characters.
  • Prolost Front/Back Visibility gives you simple checkboxes to control a 3D layer’s Opacity based on whether the camera sees it from the front or back.
Prolost Arrow

Prolost Arrow

Prolost Spanner 2D

Prolost Spanner 2D

Prolost Front/Back Visibility

Prolost Front/Back Visibility

Fun Silly Stuff

  • Prolost Arrow draws a simple arrow on your image. It’s not going to replace Red Giant Universe’s Line effect (seriously that thing is amazing), but it’s handy for simple callouts, which is what I made it for.
  • Prolost Mosaic by Size is new in 2.0. I built it when I realized that whenever I use the Mosaic effect, I almost always wind up doing math to let me set the size of the blocks in pixels.
  • Prolost Fast Blur is also new in 2.0, and you can read all about it here.

Zero Dependencies

The Prolost EDC presets have no dependencies that can break, so they are safe to use in any project, even one you plan on sharing with someone who doesn’t have Prolost EDC.

Most of the Prolost EDC presets work all the way back to After Effects CS6.

Free, or Pay What You Want

Prolost EDC is a free download, no strings attached. I’d rather have you using Prolost EDC than scratching your head about whether or not it’s worth paying for.

But if you, like me, enjoy paying for useful tools, the option is there.

You can also feel free to pay nothing now and sign up for (very infrequent) updates. I’ll email you in a few weeks, and if you’ve found EDC useful, you’ll have the option to pay something then. You can unsubscribe from these updates at any time.

Free Updates Forever

The other reason to sign up is that you’ll be notified when there’s an update like this one, and you’ll be able to download it for free, right from the email. That’s right, I have the world’s stupidest subscription business model: Pay once at the beginning — or don’t — and get free updates forever.

Get Prolost EDC
Tags: Adobe After Effects, Motion Graphics, Visual Effects, Red Giant, Universe
Comment
5blursCOmpare_01_APC_1373-hdr_0001.jpg
5blursCOmpare_01_APC_1373-hdr_0002.jpg
5blursCOmpare_01_APC_1373-hdr_0003.jpg
5blursCOmpare_01_APC_1373-hdr_0004.jpg
5blursCOmpare_01_APC_1373-hdr_0005.jpg
5blursCOmpare_01_APC_1373-hdr_0006.jpg
5blursCOmpare_01_APC_1373-hdr_0007.jpg
5blursCOmpare_01_APC_1373-hdr_0001.jpg 5blursCOmpare_01_APC_1373-hdr_0002.jpg 5blursCOmpare_01_APC_1373-hdr_0003.jpg 5blursCOmpare_01_APC_1373-hdr_0004.jpg 5blursCOmpare_01_APC_1373-hdr_0005.jpg 5blursCOmpare_01_APC_1373-hdr_0006.jpg 5blursCOmpare_01_APC_1373-hdr_0007.jpg

A Tale of Five Blurs

February 16, 2018

This is a follow-up to A Take of Three Blurs, which I wrote in 2006 as a guide to the blur effects in Adobe After Effects.

Twelve years later, there are some new blurs in After Effects, some new best practices, and new potential for confusion.

TLDR

Use Fast Box Blur now, for everything.

But c’mon, there’s so much more to know about After Effects blurs!

The Three Oldies

This was the breakdown in 2006:

Fast Blur was a good, general-purpose blur. It was “fast” because it was just a three-iteration box blur, and box blurs can be fast on the CPU. Most people’s default choice of blur at the time.

Box Blur has the exact same blur engine as Fast Blur, but with control over the number of iterations. At three iterations, it matches Fast Blur perfectly. At one iteration, it produces a useful squared-off blur effect. At greater-than-three iterations, it produces a smoother, rounder blur than Fast Blur. My advice was to reach for this blur most often, as it offers the most control.

Gaussian Blur also used the same blur engine as Fast Blur, also at three iterations. But it lacked a Repeat Edge Pixels option, so my advice was to never use it.

Where Are They Now?

All three of these venerable old blur effects are now obsolete.

Fast Blur has been renamed to Fast Blur (Legacy) and moved to the Obsolete category, as it has not been optimized for GPU rendering.

Box Blur, the blur I recommended using most often? There’s no more effect by that name.

Gaussian Blur has been renamed to Gaussian Blur (Legacy) and moved to Obsolete. I didn’t recommend you use it in 2006, and now Adobe agrees.

The New Hotness

What happened to Box Blur? It’s actually still there, just under a new name. It’s called Fast Box Blur now, and it has been optimized for the GPU. It also has a new default of three iterations.

Point of order: Where Fast Blur was “fast” because box blurs are fast on the CPU, Fast Box Blur is “fast” because it runs on the GPU.

The name change was also designed to make it easier to find for folks like me who often type “fast” into the Effects and Preset panel to search for Fast Blur.

If you have old projects that used Box Blur (as I advised), you'll find those effects automatically updated to Fast Box Blur.

The new After Effects Gaussian Blur is actually the old Premiere Pro Gaussian Blur. Note the negative values on the scopes corresponding with the discolored halos around the highlights.

A new Gaussian Blur was added to the After Effects CC 2017 release, and was meant to replace both Fast Blur and Gaussian Blur. However, this blur, inherited from Premiere Pro, gives different visual results than Fast Blur, and could push some dark colors into negative values when used in 32bpc. If matching Premiere matters to you, you might consider using this blur. Otherwise, I’d suggest avoiding it.

So:

  • Fast Blur became Fast Blur (Legacy). Don’t use it.
  • Box Blur became Fast Box Blur, and it’s good. Use it!
  • Gaussian Blur became Gaussian Blur (Legacy). Don’t use it in 2006 or now.
  • Premiere Pro’s questionable Gaussian Blur was added to After Effects, and takes the Gaussian Blur name. Don’t use it.

Fast Box Blur is the Future

So once we wade through the family tree of the three-now-four After Effects blurs, all is well, right? We have Fast Box Blur to meet all our legacy needs. It visually matches the blurs we’ve long used and loved. It’s fast and future-proofed. Life is good.

But there is one problem with using Fast Box Blur as a one-to-one replacement for Fast Blur: The Blur Radius control is scaled differently.

Specifically, by a factor of 0.37. In other words, a Fast Blur (Legacy) with a Blur Radius of 100 is a perfect visual match for a Fast Box Blur with a radius of 37.

I think this is because, while Fast Box Blur is an ideal replacement for Fast Blur (Legacy), it was designed to replace Box Blur perfectly, and Box Blur, it seems, had a multiplier built-in so that its previous default of one iteration would be a reasonable visual match to the old Gaussian Blur and Fast Blur effects.

So if you have long relied on Fast Blur, there’s not a modern, GPU-enabled blur that works exactly the way you’re accustomed to.

Prolost Fast Blur

Well I can fix that.

I created a simple preset that gives Fast Box Blur a new Blur Radius slider, and used an expression to multiply the value by 0.37. Hashtag math genius.

Actually, I made it a little more complex than that, because I also added a toggle called Visual Match Radius. With this on, the expressions attempt to scale the Blur Radius so that the results are visually similar at any number of iterations. Turn this off and radius just gets the simple 0.37 scale.

Screenshot 2018-02-16 09.31.52.png

Why should you use Prolost Fast Blur? Maybe you’re just used to the blur values from Fast Blur. Or maybe you’d like to be able to adjust Iterations without radically affecting the size of the blur.

Don’t use Prolost Fast Blur when you need more than one blur effect on the same layer though — the expressions will break.

Prolost Fast Blur is included in Prolost EDC, my free (or pay what you like) collection of handy presets that I keep with me wherever I use After Effects.

Get Prolost EDC

Like all the Prolost EDC presets, Prolost Fast Blur has no dependencies that can break, so it’s safe to use in any project, even one you plan on sharing with someone who doesn’t have Prolost EDC.

Recommendations

As before, but now for different reasons, avoid Gaussian Blur.

Use Fast Box Blur for literally every blur you do in After Effects from now on (or until the next follow-up post in 2030). An Iterations setting of three is usually fine. Five is smoother. One is useful for certain effects.

If you want to replace old instances of Fast Blur with Fast Box Blur, remember to multiply the Blur Radius by 0.37. If you have keyframes on Blur Radius, you can add this expression to preserve the animation with the new values:

value * 0.37

If you want that multiplication/expression-typing handled for you, use Prolost Fast Blur. It’s Fast Box Blur with a radius that matches Fast Blur’s.

Get Prolost Fast Blur
Tags: Adobe After Effects, Visual Effects, Motion Graphics, Image Nerdery
Comment

Colorista IV running in Premiere Pro.

How Premiere Could be Great at Color

December 08, 2017

Adobe Premiere Pro has been aggressively pursuing the creative editorial market at all levels, from feature films to YouTube. It’s now where I do all my cutting, and even finishing. Yes, that’s right, my age-old advice to finish in After Effects instead of an NLE is well and truly obsolete. Premiere renders with great quality, and any tools I felt were missing from the pipeline I’ve created myself.

Part of Premiere’s ascendancy has included folding in the color features of SpeedGrade, exactly as I advised back in 2011. The result, the Lumetri color panel, is a perfectly serviceable color corrector. Of course I prefer Magic Bullet Colorista, but that’s not what I want to talk about here. There are actually quite a few things that Premiere could do to be amazing at color that have nothing to do with Lumetri.

ICC Display Color Management

I bet most Premiere editors are using their computer monitor as their primary display for the Program panel. Sure, ideally you’d be using additional video hardware and a calibrated broadcast monitor, but color matters to everyone, not just those editing for broadcast.

Color managed red in After Effects on the left, non-color-managed red in Premiere on the right.

Color managed red in After Effects on the left, non-color-managed red in Premiere on the right.

My consumer-grade iMac has a wide-gamut display, so colors in Premiere look way too saturated. After Effects has solved this handily, and colors there very closely match my calibrated OLED display.

Put simply, it’s not good for color grading when your colors look wrong. Premiere should implement display color management, make sure it’s compatible with After Effects, and offer some well-tested color settings for output to YouTube and other increasingly-important non-broadcast platforms.

Stillstore

After Effects has long had this great feature where you can press Shift + F5 to take a snapshot of the comp preview, and then tap F5 to recall it. Better still, F6–8 work the same, for a total of four separate snapshots. The old-school colorist term for this is a “stillstore,” and it’s so essential to good color work that we built it in to Magic Bullet Looks 4.

The Reference Library in Magic Bullet Looks 4.

The Reference Library in Magic Bullet Looks 4.

You need a stillstore or reference image feature for matching shots, for consulting reference, for end-of-day sanity checks, and even just for the good, old-fashioned before-and-after trick. I’d be thrilled if Premiere did this just like After Effects does, but there’s even an opportunity to do it better, with the addition of a split-screen mode, which you'll see about a dozen times per hour in a Resolve color session.

Better Masks

I love showing off the powerful combination of Colorista IV and Premiere’s built-in effects masks. I wish After Effects had the same visually prominent interface to apply masks to effects. But Premiere’s masks have some limitations.

While you can apply multiple masks to an effect, you have no control over how they interact. I’d love to be able to cut a hole in one mask with another, and parent one mask to another’s motion.

If you want to color correct Saturn's rings, but not Saturn, you'll need something other than Premiere.

If you want to color correct Saturn's rings, but not Saturn, you'll need something other than Premiere.

Premiere’s Masks can be feathered, but it would be useful to be able to vary the feather across the mask. After Effects has this feature, but the implementation is terrible. Premiere has an opportunity here to do something better — and maybe After Effects could adopt the results too.

Faster Mask Tracking

Speaking of masks, it’s great that masks can be tracked in Premiere. With Colorista IV’s keyer and Premiere’s mask tracking, you really needn’t feel like you’re missing out on much capability if you grade in Premiere instead of Resolve. But Premiere’s mask tracking is painfully slow compared to Resolve’s. Simple request: Make it faster.

I tracked a simple mask on a 4k clip in @AdobePremiere and @Blackmagic_News Resolve. pic.twitter.com/73sjEXBsfM

— Stu Maschwitz (@5tu) December 8, 2017

In this demo neither track is great, but my solution would usually be to try the track again in reverse. I could do that quite a few times in Resolve before I'd finished the first track in Premiere.

Color Mode for the Timeline

Resolve's color timeline.

Here’s a case where Resolve, a color app that has added more and more editorial capability, can lead the way to Premiere, which is working in the opposite direction. When you switch to the Color tab in Resolve, the timeline becomes a series of thumbnails. No durations, no layers, nothing to distract you from the essential task of color work. It’s easy to see how shots are matching up, what other shots might require similar color to the one you’re working on, and so much more. It’s an indispensable visual overview of your color work.

If Premiere intends to take color seriously, it should have a color mode for its timeline. And it could easily beat Resolve at this by color managing the thumbnails, which Resolve does not do.

More Thumbnails. Thumbnails All the Time.

Me coloring a short for a friend back in the Colorista II days. Thumbnails on the right courtesy of my free DV Rebel Tools.

Viewing your color work as thumbnails is so important that it remains one of the reasons I might still color in After Effects instead of Premiere. For the DV Rebel’s Guide, I created a series of color presets (which Dan Ebberts helped me automate with brilliant scripts) that, among other things, automate the creation of a thumbnail view of your timeline.

DV Rebel Tools

Still free after all these years.

Versions

One crucial thing that dedicated color apps like Resolve do is help you manage versions of the color on a shot. If you don’t think this matters, you’ve never graded with a client in the room. But it’s just as useful for solo practitioners.

Premiere could tackle this in a general-purpose way by allowing versions of any effect or set of effects on a clip. That way this could just be an awesome Premiere feature, not just for color work.

Color is More Than a Color Corrector

Notice, as promised, I didn’t mention Lumetri once. There’s much, much more to color work than manipulating a color correction tool. I’m happy that Lumetri exists, and happier still when folks get excited enough about color to move on to Magic Bullet Suite, but the suggestions I’ve made here will help anyone, with any workflow, whether you’re using Lumetri, Colorista, or anything else. One of Premiere’s big advantages is that third-party effects are first-class citizens, so it’s my favorite place to use many of the tools I design.

Premiere has become a great editing tool, and is on its way to becoming a great finishing tool — and I’ll continue to do all I can to support that vision with plug-ins and presets. But there are some things that a plug-in just can’t do. I’m ready for Premiere to get serious about color, and I think the filmmaking and editorial community is too.

Tags: Color, Magic Bullet, Red Giant, Adobe Premiere, Adobe, DV Rebel's Guide
9 Comments
Prev / Next
Featured
Maxon One
Maxon One

Cinema 4D, Forger, Red Giant, Redshift, Universe, and ZBrush, all in one bundle.

Slugline
Slugline

Screenwriting for Mac, iPad, and iPhone

Prolost Store
Prolost Store

Apps, presets, and other goodies for filmmaking and photography.


Featured Post

Featured
Log is the “Pro” in iPhone 15 Pro
Oct 10, 2023
Log is the “Pro” in iPhone 15 Pro
Oct 10, 2023
Oct 10, 2023

Recent Posts

Featured
Cameras, Phones, and Log — What’s the Juice?
Feb 3, 2025
Cameras, Phones, and Log — What’s the Juice?
Feb 3, 2025
Feb 3, 2025
Kino: My New Favorite iPhone Video App
May 29, 2024
Kino: My New Favorite iPhone Video App
May 29, 2024
May 29, 2024
Apple’s “Let Loose” iPad Event was Shot on iPhone — With Panavision Lenses
May 9, 2024
Apple’s “Let Loose” iPad Event was Shot on iPhone — With Panavision Lenses
May 9, 2024
May 9, 2024
iPhone ProRes Log in Peru and Taiwan
Jan 30, 2024
iPhone ProRes Log in Peru and Taiwan
Jan 30, 2024
Jan 30, 2024
What I Want to Do in Apple Vision Pro
Jan 19, 2024
What I Want to Do in Apple Vision Pro
Jan 19, 2024
Jan 19, 2024
What Does and Doesn’t Matter about Apple Shooting their October Event on iPhone 15 Pro Max
Nov 7, 2023
What Does and Doesn’t Matter about Apple Shooting their October Event on iPhone 15 Pro Max
Nov 7, 2023
Nov 7, 2023